
Fixing Leaking Bay Window in Northville, Michigan: A Step-by-Step Guide
Bay windows are one of the most elegant and functional features a home can have. They provide natural light, extra interior space, and add architectural interest to the exterior. However, bay windows can also be a common source of water leaks if not properly maintained. In this Northville, Michigan home, a 13-year-old bay window had begun leaking, causing noticeable water damage to the ceiling below. Our team at Level Up Improvement was called in to address the issue and restore the home to a dry, secure condition. This guide walks homeowners through the process of fixing a leaking bay window, explaining why prompt action is essential and how proper installation and maintenance prevent future problems.
Why Bay Windows Leak
Bay windows are more complex than standard windows because they project outward from the wall, often with multiple joints, angles, and connections to the roofline. Each of these areas can be vulnerable to water intrusion if the flashing or sealant fails. Flashing, the waterproof material installed around windows and roof penetrations, is designed to channel water away from the home. Over time, even the best flashing can fail due to wear, improper installation, or extreme weather conditions.
In Northville, Michigan, homeowners face a variety of weather challenges throughout the year. Heavy snow in winter, spring rains, and summer thunderstorms can all put additional strain on exterior windows. When flashing fails, water can leak behind the siding and window frame, eventually reaching the interior ceiling. Left unchecked, these leaks can cause structural damage, mold growth, and even deterioration of the window frame itself.
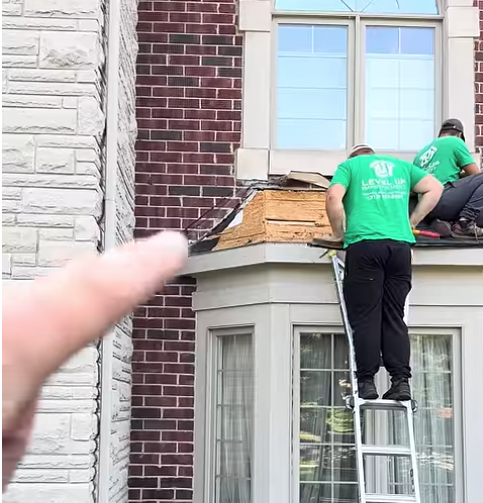
Step 1: Inspecting the Bay Window and Identifying the Leak
The first step in fixing a leaking bay window is a thorough inspection. Our team carefully examined both the interior and exterior of the Northville home. Signs of water intrusion were clear: water stains on the ceiling and soft, sagging drywall beneath the window. On the exterior, we looked for visible gaps, deteriorated caulk, and worn or missing flashing around the window perimeter.
Flashing failure was immediately identified as the main cause. Improper installation at the time the window was installed had allowed water to seep in slowly over the years. While cosmetic repairs like repainting or replacing damaged drywall might address the visible damage temporarily, without addressing the flashing, the leak would continue and likely worsen.
Step 2: Preparing for Repair
Before installing new flashing, preparation is critical. The repair team removed all damaged caulk, sealant, and debris from around the bay window. Old sealant often loses adhesion over time, and even small remnants of dirt or moisture can prevent new caulk and flashing from bonding properly. This stage also involved assessing the full extent of any damage to the siding, window frame, and interior drywall.
Proper preparation ensures that the new flashing and sealant will perform correctly. For homeowners in Northville, taking the time to thoroughly prep the area can prevent future leaks and reduce the risk of recurring water damage.
Step 3: Installing New Flashing
With the surface cleaned and prepped, the team installed new flashing around the bay window. The installation process is precise: the flashing must integrate seamlessly with both the siding and the roofline. Proper overlap is essential, and joints must be sealed correctly to ensure water is directed outward, not behind the window.
Attention to detail is crucial during this step. Misaligned flashing or blocked weep holes can allow water to pool behind the window, causing damage over time. By carefully overlapping and securing each piece, the flashing creates a durable barrier against water intrusion, even during Northville’s heaviest rainstorms and winter snow.
Step 4: Sealing and Finishing
Once the new flashing was installed, the next step was to seal all edges and joints with high-quality exterior caulk. This creates a watertight barrier that prevents leaks from occurring in the future. On the interior, water-damaged drywall was repaired, primed, and painted to match the existing ceiling.
To ensure the repair was effective, the team performed a water test using a hose to simulate rainfall. This step is essential when fixing a leaking bay window, as it confirms that the flashing and caulk are working properly before the project is considered complete.
Preventing Future Bay Window Leaks
Fixing a leaking bay window is only part of the process. Long-term protection requires regular inspection and maintenance. Homeowners in Northville should periodically check for:
-
Cracks or gaps in caulk around the window
-
Warping or deterioration of the window frame
-
Signs of water stains or mold inside the home
-
Blocked or damaged flashing
Early detection of these issues can prevent costly repairs down the road. In addition, choosing high-quality materials for both windows and flashing, along with professional installation, greatly reduces the likelihood of leaks.
Why Timely Repairs Matter
Promptly addressing a bay window leak prevents additional damage to the home. Water intrusion can lead to mold growth, structural deterioration, and even insulation damage. By fixing the issue quickly, homeowners protect not only the aesthetics of their home but also the structural integrity.
In Northville, Michigan, homes experience seasonal weather extremes that can accelerate damage. Timely repairs of bay windows ensure that the home remains protected year-round, keeping both interior spaces and exterior siding safe from moisture.
Choosing the Right Contractor for Bay Window Repairs
Hiring a trusted, local contractor in Northville is key to successful bay window repair. Professionals bring experience, proper tools, and knowledge of local weather conditions. At Level Up Improvement, we emphasize attention to detail, high-quality materials, and a thorough repair process that ensures lasting results. Local expertise ensures that repairs are done right the first time, giving homeowners peace of mind.
Final Thoughts on Fixing Leaking Bay Windows in Northville, Michigan
Bay windows add beauty and character to any home, but they require careful attention to prevent leaks. In this 13-year-old Northville home, our team demonstrated how professional assessment, proper flashing installation, and careful finishing can completely eliminate water intrusion.
For homeowners in Northville and surrounding areas, regular inspection, maintenance, and prompt repairs are essential. Properly fixing a leaking bay window not only restores a home’s interior but also protects its value, energy efficiency, and long-term durability.
If you notice water stains, soft ceilings, or dripping near your bay windows, don’t wait. Contact a professional Northville contractor to inspect, repair, and safeguard your home. With the right approach, even older homes can remain dry, safe, and beautiful for years to come.